One of the things I love about Sencha Touch is the built in themes. Android has 4.x has two themes: Halo Dark, Halo Light. There is only one Android theme for Sencha Touch and it's dark. I've been bugging them for awhile to include a light theme and their response was "You do it".
I googled for a long time and couldn't find a theme someone else did. I gave in and decided to make my own theme after finding this one. It's beautiful. I read his breakdown and he created a theme by copying the winPho theme and made changes until he was happy. I did something similar. I copied the Android theme and started digging in.
That's when I found it. There is a Sass variable in /[Sencha SDK folder]/resources/themes/stylesheets/sencha-touch/mountainview/var/_Class.scss called $dark-theme. If you set this variable to false in your local sass file for android it becomes a light theme.
I wish this was explained better. It's only through source code diving can we find the true answers.
Showing posts with label touch. Show all posts
Showing posts with label touch. Show all posts
Wednesday, September 17, 2014


Thursday, June 5, 2014
Sencha Touch Themes: Using built-in themes for iOS and Android
One of the things I like about Sencha Touch is the built in device themes. I like being able to make a web app look native.
I found many resources that talked about the themes but none gave very good instructions on how to make them work. I finally found a video that walked you through some of the process involved in making themes work. It left out some important stuff that I found through lots of trial and even more error.
I'll show you how to apply a theme to the default sencha project. You can apply these steps to your own project.
I found many resources that talked about the themes but none gave very good instructions on how to make them work. I finally found a video that walked you through some of the process involved in making themes work. It left out some important stuff that I found through lots of trial and even more error.
I'll show you how to apply a theme to the default sencha project. You can apply these steps to your own project.
- Create an example app.
- sencha -sdk [path to sdk] generate app [AppName] [path]
- You'll need to create scss files for the different platforms you want to support.
- cupertino.scss (iOS 7 styling)
- cupertino-classic.scss (iOS 6 styling)
- mountainview.scss (Android)
- Each of these files will include two imports lines that define our theme styles.
@import 'sencha-touch/[platform name]';@import 'sencha-touch/[platform name]/all';
[platform name] is the name of the style you're including. cupertino.scss will use "cupertino" and mountainview.scss will use "mountainview". All the platform names are available here under tip 2. - Next you'll need to run "compass compile" or "compass watch" in the resources/sass folder.
- Now we have to update app.json to include the new css files that were generated by compass. Look for the css option and add each platform as an object to the css array.{"path": "resources/css/cupertino.css","platform": ["ios"],"update": "delta"}
Make sure to update the platform value with the appropriate value. The options are available here under available platforms.
IMPORTANT NOTE: Make sure to add the "platform": ['desktop'] to the app.css entry. If you don't app.css will be included in every theme and it will break the display. - Lastly you'll need to run sencha app build to bring everything together. You can test the different templates by appending ?platform=[platform name] to your uri.
eg: senchaapp.io/?platform=ios
I've added the example project to github so you can pull that down as an example.
Monday, February 24, 2014
Sencha Touch: Reorder a list with drag and drop handles using SortableList
Part of a project I'm working on requires the ability to reorder a list. I was pretty sure sencha touch could handle this, but couldn't figure out how to do it. I searched google for a solid week. I had one lead that turned bad after digging into it further. I basically gave up and moved onto the next issue when I ran across the solution buried in their documentation: SortableList
The second problem arose from the poor documentation on this feature. Outside of the class docs there is nothing explaining how to use it. The upside is at least it's easy to view the source.
I ran across this forum post that talked about a bug in the code. This was the only code I found that gave an example of how the code works.
There are a few things required to use this plugin.
Step 1: Include the plugin
Step 2: Configure the drag handle
The tag used for the list-sortablehandle is the object that will start the reorder process. This can be styled using whatever you like.
Step 3: Listen for the finishing event
It was smooth sailing after this point.
The second problem arose from the poor documentation on this feature. Outside of the class docs there is nothing explaining how to use it. The upside is at least it's easy to view the source.
I ran across this forum post that talked about a bug in the code. This was the only code I found that gave an example of how the code works.
There are a few things required to use this plugin.
Step 1: Include the plugin
// Make sure the plugin in include when the app builds
requires: ['Ext.plugin.SortableList'],

config:{
        // Include the plugin in your config. Don't forget the period on the class name
        plugins: [{xclass: 'Ext.plugin.SortableList', handleSelector: '.gripper'}],


        // These are required to fix a bug that exists in the plugin
        infinite: true,
        variableHeights: true,
        ...
}
Step 2: Configure the drag handle
config: {
        // Set the class to the name you passed in for the handleSelector
        itemTpl: '<span class="gripper"></span>[html goes here]'
        ...
        }
The tag used for the list-sortablehandle is the object that will start the reorder process. This can be styled using whatever you like.
Step 3: Listen for the finishing event
config: {
        listeners:[
            event: 'dragsort',
            // to is the new position in the list
            // from is where the item used to be
            fn: function(listObject, row, to, from)
        ]
        ...
}
It was smooth sailing after this point.
Saturday, December 14, 2013
Sencha Touch: Problems with Date Time Picker
Part of a project I'm working on requires an form element that allows the user to select a date and time for the same field. Sencha Touch has a built in form field for selecting a date and it works really well. They don't have one that allows you to pick both the date and the time.
I found a plugin on Sencha's site that seemed to be just what I was looking for. There were a few issues with it.
#1 No install instructions.
This is the first plugin I've used and I couldn't find anything on Sencha's site that was helpful. After some digging I found instructions for another plugin that pointed me in the right direction.
UPDATE
The github version of the plugin has integrated my pull request that fixes the issues I ran into.
I found a plugin on Sencha's site that seemed to be just what I was looking for. There were a few issues with it.
#1 No install instructions.
This is the first plugin I've used and I couldn't find anything on Sencha's site that was helpful. After some digging I found instructions for another plugin that pointed me in the right direction.
- Copy the ux folder to your app directory.
- Open your app.js file and locate the Ext.Loader line. If there isn't a setPath method chained to setConfig add one. Add these key/value pairs to the object. They correspond to the Ext.define namespaces for DateTime.js and DateTimePicker.js located in the ux folder.
- 'Ext.ux.field' : './ux'
- 'Ext.ux.picker': './ux'
#2 Bugs
The first problem I had was the cancel button destroyed the picker. One feature of the plugin allows you to destroy the picker to save memory. It's missing a check for the destroy option and nukes it on cancel.
The second problem is if you press OK to the default date it doesn't actually read it properly. Deep in DateTime.js the getValue method looks through the items on the picker and grabs the slots. It calls getValue on each slot but returns nothing. You need to pass true for it to read the proper value.
I was able to find the original source on github. I forked the repo and fixed all the bugs I found. I submitted a pull request so hopefully I'll hear back from the guy soon so future users will have fewer problems.
UPDATE
The github version of the plugin has integrated my pull request that fixes the issues I ran into.
Thursday, November 14, 2013
Sencha Touch: Submit the form with Go/Enter
I'm in the process of refactoring some code from my first Sencha Touch project. I followed a really great tutorial from Miami Coder used to build a login page. There are a few things I wish it did better in terms of separating view and controller code, but you learn that stuff on the road.
One thing I really wish it covered was submitting the form using the Go key on iPhone, or Enter key. It's reliant on pressing the Log In button and then letting the code grab the values and move on. I want to make two changes. I want to listen for the Go key and submit the form, and I want the code to exist in the Controller, not the View.
First let's set up the View.
'control' is my new favorite property. It's great for event listening. Once I found out I could tie a function to a button without listening for a command I never looked back.
One thing I really wish it covered was submitting the form using the Go key on iPhone, or Enter key. It's reliant on pressing the Log In button and then letting the code grab the values and move on. I want to make two changes. I want to listen for the Go key and submit the form, and I want the code to exist in the Controller, not the View.
First let's set up the View.
                xtype: 'fieldset',
                itemId: 'login-form',
                name: 'login-form',
                items: [
                    {
                        xtype: 'textfield',
                        placeHolder: 'Username',
                        itemId: 'user-name-text-field',
                        required: true,
                        autoComplete: false,
                        autoCorrect: false
                    },
                    {
                        xtype: 'passwordfield',
                        placeHolder: 'Password',
                        itemId: 'password-text-field',
                        required: true
                    }
                ]
            },
            {
                xtype: 'button',
                itemId: 'login-button',
                action: 'login',
                // This is just a color style
                ui: 'action',
                text: 'Log in',
                cls: 'login-button'
            }
Now let's set up the Controller.
config: {
        control:{
            // Listen for the login button
            'button[action=login]':{
                tap: 'tryLogin'
            },
            // Listen for a field form submit
            'fieldset[name=login-form]':{
                action: 'tryLogin'
            }
        }
    }
I listen for events in the Controller instead of launching events through the Application from the View and listening for them elsewhere. The View is kept nice and clean and all the logic is in the Controller where it belongs. The Controller can grab a reference to the View and update whatever it needs.'control' is my new favorite property. It's great for event listening. Once I found out I could tie a function to a button without listening for a command I never looked back.
Thursday, July 18, 2013
Sencha Touch: Using the Action property of the Button element
I've been trying to wire up the buttons in my UI to handlers inside the view so I could have them fire an event to the controller and complete an action, but it required me to put a function in the config section and it looks messy and isn't portable.
After much googling I found a hidden property of Button called action. I can't find very good documentation on it and wanted to show an example of it because it will make your life so much easier.
This saved me quite a few steps because all my button actions triggered something in the controller. This way I can skip using fireEvent and just tie the event to a handler method in the controller.
After much googling I found a hidden property of Button called action. I can't find very good documentation on it and wanted to show an example of it because it will make your life so much easier.
// Building a button inside of an items array
{
    xtype: 'button',
    action: 'warnOnLeave',
    align: 'left',
    iconCls: 'home',
    ui: 'back',
}

// Handle the button click inside a controller
control: {
    // Listen for the new button press
    'button[action=warnOnLeave]':{
        tap: 'onCreateNewContent'
    }
}
This saved me quite a few steps because all my button actions triggered something in the controller. This way I can skip using fireEvent and just tie the event to a handler method in the controller.
Sencha Touch: Center elements in a tab panel
By default elements in Ext.tab.Panel are aligned left. I wanted to center them so it's not so close to the back button in the Title Bar.

I found the answer while digging around in the comments section of the Sencha Touch documentation and wanted to surface the answer so others could easily find it.
This will center the elements.
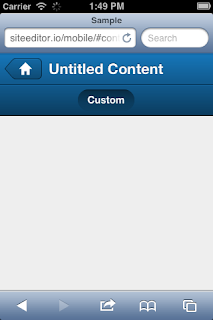
Here is the documentation for centering elements on a panel.

I found the answer while digging around in the comments section of the Sencha Touch documentation and wanted to surface the answer so others could easily find it.
Ext.define("Sample.view.ContentEditorContainer",{
    extend: 'Ext.tab.Panel',
    alias: 'widget.contenteditorcontainer',

    config: {
        // How to center tabs in a panel floating at the top
        tabBar: {
            layout: {
                type: 'hbox',
                align: 'center',
                pack: 'center'
            }
        },
This will center the elements.

Here is the documentation for centering elements on a panel.
Friday, July 12, 2013
Sencha Touch: Ext version of jQuery methods
I'm trying to use as many native parts of Ext as I can without leaning on other libraries. It's not so much that I wouldn't use the other libraries anyway, but it's better to embrace change. There's a lot of useful stuff that Underscore handles really well.
Monday, July 8, 2013
Sencha Touch: Disable script caching
While working on a Sencha Touch project I needed to look in one of the core sencha files. The problem is there is a _dc property attached to every script it brings in. It's great for making sure your code isn't cached, but terrible for debugging.
After a big of digging I found the code needed to turn off caching. Open up the app.js file and look at the very top. You should see a Ext.Loader.setPath method. Update it to look like this and caching should now be disabled.
After a big of digging I found the code needed to turn off caching. Open up the app.js file and look at the very top. You should see a Ext.Loader.setPath method. Update it to look like this and caching should now be disabled.
Ext.Loader.setPath({
    'Ext': 'touch/src',
    'Sample': 'app'
}).setConfig({
    disableCaching: false
});
Subscribe to:
Posts (Atom)